Showing posts with label art. Show all posts

Thursday, July 19, 2012

Word Mural How-To

As mentioned in my last post, I have been attempting to freshen up and add color to our school room.  As I was standing in the room last week, just looking at the walls...you do that too, right?...I got a wild hair to paint some large words on the wall.

This is not that unusual for me.  I co-owned a business painting wall murals for five years, so they are sort of my go-to decorating idea.  So, while murals might be out-of-the-box for most people, it's really not at all for me.  As a matter of fact, I should probably be thinking more out of the box myself when it comes to decorating...

Here are a couple murals I've painted in our home elsewhere...

J1's nursery

Girls' room

So generally, we would start with a sketch, transfer that to an overhead projector, and project the image on the wall as we began a mural.  But for something so simple as a word, I used a much simpler method.


First, I used a level to measure out and draw guidelines on the wall.  It's hard to see them in this picture, but that is EXACTLY what you want!  Draw your lines lightly, because you will be erasing them once you've painted over your word.  I like to draw 3 lines...think like you're back in Kindergarten and you are writing on a writing tablet.  Then I just used my own handwriting (but I took my time and was careful to be pretty and consistent), using my guidelines.  The last thing you will want is a crooked word on your wall!

Next, I thickened up the letters using pencil.

I used this paint straight from the bottle, which made it easy since I didn't have to keep stopping to mix paint.  I use acrylic paint, but when you purchase acrylic paint you will want to take note that it is sold in gloss as well.  If you are not painting on glossy walls, you will probably not want the gloss paint.

This is our new art display center.  I bought these clipboards for $1 each and drilled one screw through the top center into the wall.   Now the kids have a place to hang their artwork in the school room.

This was painted above the doorway, so the kids can read this as they leave the room. :o)
Pin It Now!

Wednesday, July 18, 2012

School Room Art: A Copycat Tutorial


I recently found the above artwork for sale online for about $130.  I really loved the idea for my school room, but had no intentions of paying quite so hefty a fee for school room artwork.  I decided that I would keep my eyes out for wood materials at craft shops and such to recreate it myself.

Alas, I found myself months later still staring at a blank wall in my school room and having not found the perfect wood material.  I had had enough.  I was going to create the art work.  Today.  With whatever I could find in my house.


Here's what I found:
A large piece of white cardboard.  (It was thicker than posterboard but not quite as thick as foam board.)
Acrylic paint.
Paint brushes.
A Pencil.
A level and ruler.
An exacto knife.


I measured and cut nine 10" by 10" squares.


For my first board, I used two colors.  Yellow and grey.
First, I quickly applied the grey brush strokes.
Acrylic paint dries much faster than oil paints, but you will still have some time to apply the yellow paint and blend the colors together until you have the desired effect.  You will want your brush to be slightly wet, but not too wet.  If it is too wet or you apply the paint very thick the cardboard will start to curve.  Don't worry too much about it though.

I like an assembly process, so I then repeated this painting process for the background of each board.  I used the color scheme of the original artwork.
Next use your pencil to write the words.  I think the easiest way to do this is to use your own handwriting for consistency.  But to make sure each board is the same measure out your letters.  For example, on each board I started the first line 2 1/2 inches from the top, but I only wanted my letters to be 2 inches tall.  I placed a ruler at the top and bottom of where I wanted the letters to be and used it as a guide as I was writing the words "teach me".  The words "how to" were also 2 inches tall, but the last word was 4 inches tall.

Once I completed writing the words on each board, I simply went over each word with white paint.  It took a couple coats.
The only thing I actually had to purchase for this project was this Scotch mounting tape.  It cost me about $6 for 2 packages.  Simply peel and stick to the board and then peel and stick to the wall.

You'll definitely want to use your level.  Pre-measure your wall space to decide how far a part you will want to place your boards.  I spaced mine 3 inches apart.


Hope you're inspired!  Be sure to let me know if you complete this project as well!

Pin It Now!

Tuesday, December 9, 2008

Spears Art Projects

Here are photos of some of the art projects the kids have completed using Spears Art.


All of the kids pose with their Thanksgiving meal projects.


I really liked these trees the kids made. The two shades of green in the grass demonstrates how color fades the further back it goes. They drew the tree trunks and tore construction paper for the leaves.


These are Christmas bells. I know they don't look very "Christmas-y"...after the kids learned the origami folds of the bell, I let them decorate them using whatever they wanted fromt our craft box. What can I say? When you're a kid...less is not more.


The kids formed the shape of a star from pipe cleaners and filled it with glue (and a little food coloring) to make neat ornaments.


Pin It Now!

Monday, September 15, 2008

Intructions in Teaching Drawing

We have been participating in Harmony Art Mom's Sketch Tuesday for the past few weeks. This has been a really fun way to encourage the kids to do drawing practice. Harmony Art Mom displays all of the completed assignments on her blog on Tuesday and the kids love seeing their sketches online!

I co-owned a wall mural business for five years and taught art for four years. When I scheduled our school year this year I didn't schedule any time for drawing practice or choose an art curriculum, because I figured - in our house - drawing just happens. However, since I was not intentional, drawing was not happening. Sketch Tuesday has given us a reason to draw.

Like I said before, I do not use an art curriculum. So often, people have said to me, "I could never draw like that. I don't have that gift."

My answer is always the same. "Yes, you can. Drawing is a learned skill."

God is an artist and we are created in His image. Certainly some are given more natural talent than others in this area, but everyone can learn and become accomplished in the skill of drawing. I know this to be true, because I learned to draw. I am not naturally gifted as an artist.

First, you must teach your students to use references and observe them carefully. This is so hard for children, because they only want to draw from their imagination. There is a time to just let children doodle. But when they are working on drawing as a skill they need to use references, either from life or from a picture.

When my friend and I painted wall murals, we would have a reference for EVERYTHING we were painting...flowers, trees, people...and we would tape them to the wall where we were painting so that we could look at them as we were painting. When first starting it is easier to look at another artist's drawing or painting. You can often see the lines of the artist's pencil or brush and mimic them. It takes a while before you will be able to mimic the lines of a "real" picture or object as well.

Let your students "copy the masters" by giving them a copy of a famous piece of art and having them recreate it. DON'T LET THEM TRACE! But encourage them to look closely at the picture and draw it just as the artist drew it. They will get better with repeated practice. Praise their efforts, but don't be afraid to point out a mistake and show them how to correct a line that is a little wobbly or a shape that is not the right proportion.

Instruct them to DRAW LIGHTLY and to USE THEIR ERASERS! This will need to be repeated to little ones again, and again, and AGAIN. Students often want to just draw the picture quickly and be done. But drawing correctly always involves erasing your mistakes and making improvements so that your drawing looks more like your reference. (Just like editing a paper, the first draft is not the final product.) But if the student is not drawing lightly, he will not be able to erase completely. This makes for a very messy project. Once the student is certain he likes the drawing the way that it is, he can always go back and darken his lines.

It is always helpful if you, as the teacher, are willing to show the students how to draw SOME projects step-by-step. They will need to watch the movement of your hand, see how you draw and correct your mistakes to fully understand it themselves.

Photobucket
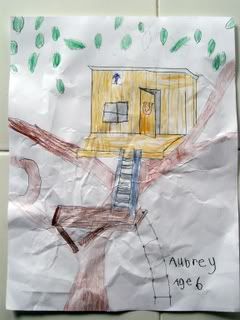
Our assignment this week for Sketch Tuesday was to draw something with a door. A6 picked a picture of a tree house from a book to draw. As you can see, I propped the book up so that both A6 and I could see it. I would point to what I was drawing in the book and then draw a line on the whiteboard. A6 would draw the same line and then we would continue.
Photobucket
Here is A6's finished product. (Please forgive the wrinkles - E1 got a hold of it, before I could take any pictures.)
Photobucket
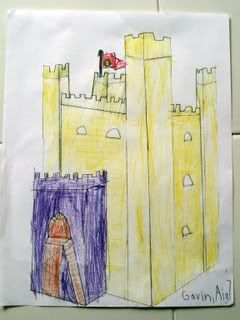
This is G7's drawing of a castle. We did it the same way. We looked at a picture in a book and I drew it step by step on the board.

If you don't feel confident drawing step by step with your child yet, try buying a book that does this for you like Draw, Write, Now. You can also rent Bob Ross videos from the library and have your children watch him draw. You can also watch free videos online of Jan Brett, children's book illustrator, drawing step by step.

Encourage your children to draw and draw and draw some more. This is how they will see their greatest improvement. Pin It Now!

LinkWithin

Related Posts with Thumbnails